
The DHT11 humidity and temperature sensor makes adding humidity and temperature data to your DIY electronics projects a breeze. It's ideal for weather stations in remote locations, home environmental management systems, and farm or garden monitoring systems.
In this article, I'll first provide some history on humidity before explaining how the DHT11 measures humidity. Following that, I'll demonstrate how to connect the DHT11 to an Arduino and provide some sample code for you to utilize in your own projects.
Here are the DHT11's ranges and accuracy:
20-90% relative humidity
Accuracy of humidity: 5% RH
0-50 °C temperature range
Temperature precision: 2% °C
3V to 5.5V operating voltage
Datasheet for the DHT11:
WHAT EXACTLY IS RELATIVE HUMIDITY?
The DHT11 is a relative humidity meter. The amount of water vapor in the air vs. the saturation point of water vapor in the air is referred to as relative humidity. Water vapor begins to condense and gather on surfaces at the saturation point, generating dew.
The saturation point varies with the temperature of the air. Cold air can contain less water vapor before becoming saturated, while hot air can hold more before becoming saturated.
The relative humidity formula is as follows:

Relative Humidity Formula Using Arduino DHT11
The relative humidity is given as a percentage. Condensation occurs at 100% RH, and the air is entirely dry at 0% RH.
HUMIDITY AND TEMPERATURE MEASUREMENT BY THE DHT11
The DHT11 measures the electrical resistance between two electrodes to detect water vapor. A moisture-holding substrate with electrodes placed to the surface serves as the humidity sensor component. When water vapor is absorbed by the substrate, ions are discharged, increasing conductivity between the electrodes. The resistance difference between the two electrodes varies proportionally to the relative humidity. Higher relative humidity reduces resistance between electrodes, but lower relative humidity raises resistance between electrodes.
The surface mounted NTC temperature sensor (thermistor) incorporated inside the DHT11 monitors temperature.

The resistance measurement is converted to relative humidity by an IC placed on the rear of the instrument. It also saves the calibration coefficients and regulates data transmission between the DHT11 and the Arduino:

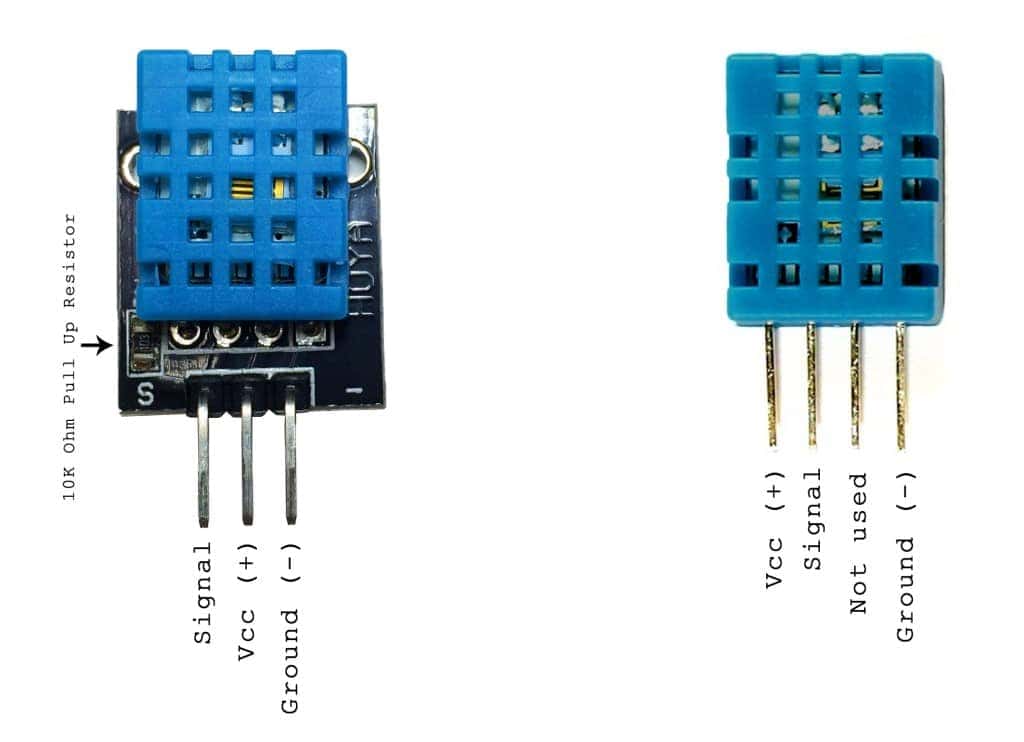
The DHT11 transmits data to the Arduino via a single signal cable. Separate 5V and ground wires supply power. A 10K Ohm pull-up resistor is required between the signal line and the 5V line to ensure that the signal level remains high by default (see the datasheet for more info).
There are two variants of the DHT11 that you may encounter. One type has four pins, while the other has three pins and is installed on a tiny PCB. The PCB mounted version is preferable since it has a surface mounted 10K Ohm pull up resistor for the signal line. Here are the pinouts for both versions:
HOW TO CONFIGURE A DHT11 ON AN ARDUINO
The DHT11 is quite simple to connect to the Arduino, although the connections varies depending on which kind you have.
CONNECTING A DHT11 WITH THREE PINS:

LINKING A FOUR-PIN DHT11:

- R1 is a 10K Ohm pull-up resistor.
ON THE SERIAL MONITOR, DISPLAY THE HUMIDITY AND TEMPERATURE
You must first install the DHTLib library before you can utilize the DHT11 on the Arduino. It includes all of the functionalities required to obtain humidity and temperature measurements from the sensor. It's simple to set up; simply download the DHTLib.zip file below and launch the Arduino IDE. Then pick DHTLib.zip from the Sketch>Include Library>Add.ZIP Library menu.
After installing it, upload the following example program to the Arduino and open the serial monitor:
#include <dht.h> dht DHT; #define DHT11_PIN 7 void setup(){ Serial.begin(9600); } void loop(){ int chk = DHT.read11(DHT11_PIN); Serial.print("Temperature = "); Serial.println(DHT.temperature); Serial.print("Humidity = "); Serial.println(DHT.humidity); delay(1000); }
The humidity and temperature values should be provided at one-second intervals.
You can modify the pin number in line 5 where it states #define DHT11 PIN 7 if you don't want to use pin 7 for the data signal.
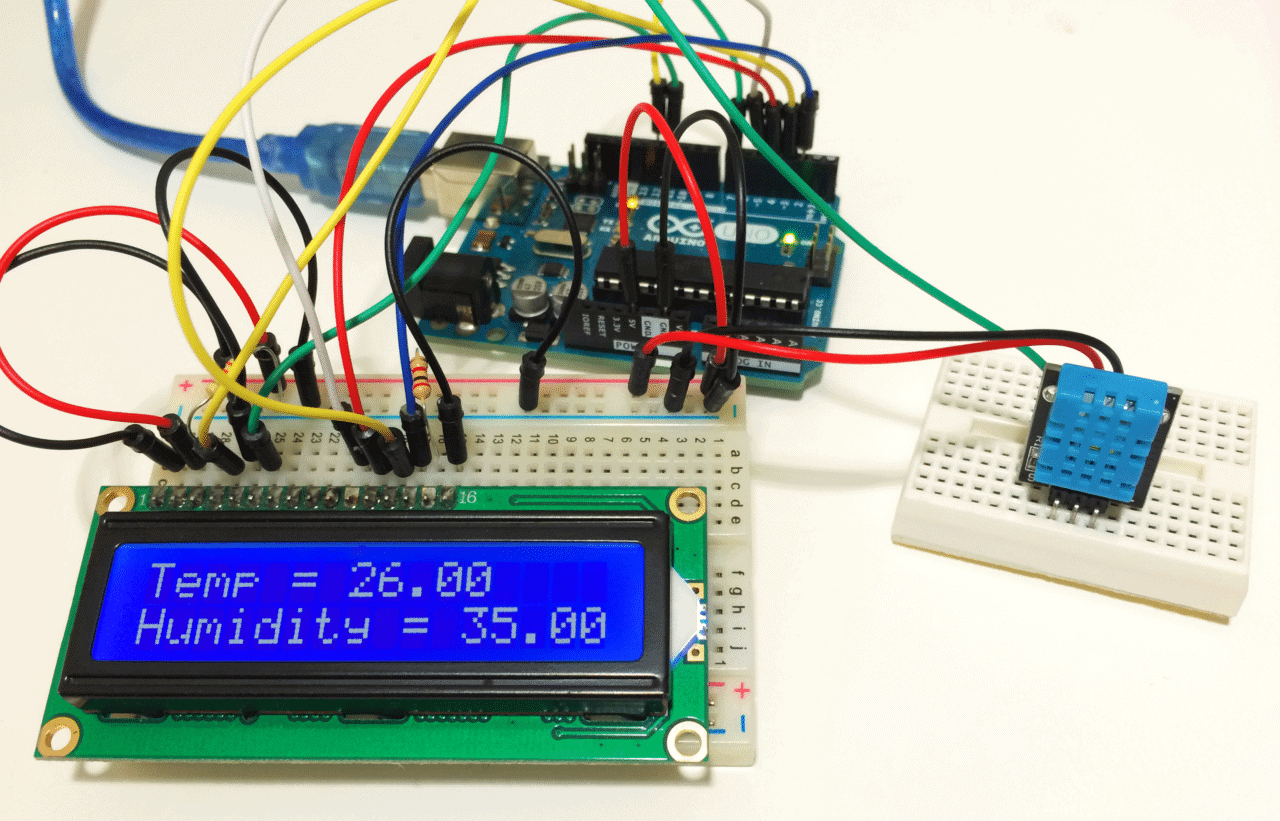
USE AN LCD TO DISPLAY HUMIDITY AND TEMPERATURE.
A 16X2 LCD is a wonderful method to display humidity and temperature measurements. Follow our lesson on How to Set Up an LCD Display on an Arduino first, then upload the following code to the Arduino:
#include <dht.h> #include <LiquidCrystal.h> LiquidCrystal lcd(12, 11, 5, 4, 3, 2); dht DHT; #define DHT11_PIN 7 void setup(){ lcd.begin(16, 2); } void loop(){ int chk = DHT.read11(DHT11_PIN); lcd.setCursor(0,0); lcd.print("Temp: "); lcd.print(DHT.temperature); lcd.print((char)223); lcd.print("C"); lcd.setCursor(0,1); lcd.print("Humidity: "); lcd.print(DHT.humidity); lcd.print("%"); delay(1000); }
APPLICATION OF THE DATA IN OTHER PROGRAMS
What if you don't want to output the humidity and temperature values but need them to calculate or regulate something else? The following code is the bare minimum required to initialize the sensor. This can be added to existing programs and DHT.humidity and DHT.temperature can be used as variables in any function.#include <dht.h> dht DHT; #define DHT11_PIN 7 void setup(){ } void loop(){ int chk = DHT.read11(DHT11_PIN); delay(1000); }


0 Comments